1.30.2011

Roasted Root Veggies

While D and I were picking up ingredients for our energy bars, we also thought we'd grab some veggies for dinner. I contemplated swiss chard, because I was craving it a little bit, but realized I didn't really know how to cook it or what else I'd need to cook it. D also seemed unenthusiastic.

Instead, we picked up a collection of root veggies and stems, and roasted them in the oven. We also added some chicken breast to make it a meal, although to keep it vegetarian, I'd just eat it with a liberal helping of parmesan cheese grated on top, and maybe some shitake mushrooms sauteed in butter. Yum!

The sweetness of the parsnips and the sweet potatoes works really well with the starchy potatoes. We watched an episode of House while dinner was cooking. This is pretty much the easiest dinner ever.. you don't even have to preheat the oven!!! It comes up to temperature while the food is cooking.

Ready for the oven.
Delicious and roasty.
----- ----- -----
Roasted Root Veggies

Ingredients:
1 red potato
3 Yukon Gold potatoes
1 purple potato
1 "Japanese" sweet potato (or some other kind)
1 Garnet yam
3 carrots
3 parsnips
0.25c olive oil
1 large clove garlic
salt and pepper


Directions:
1. Cut all the ingredients into 0.5 inch cubes and place them on a baking tray. Mince garlic and add it to the mixture.
2. Pour olive oil over them, grind pepper on top, sprinkle with salt, and toss to mix.
3. Put the veggies in the oven and turn it to 475°F. Bake for about 35 minutes, stirring every 10 minutes. The veggies will be soft, fragrant and starting to brown when they're done.
----- ----- -----

Energy Bars Take Two

Last week, I went on a training trip with my team to Austin, Texas.

Training trip = (Sleep + Eat + Row + Eat + Sleep + Eat + Row + Eat) * (Numbers of days in trip)


It was exhausting, but really, really fun. We also made a lot of great strides as a team, both physically and technically. While I'm glad to be back home with D, I'm also really glad we took the trip.

As you can see, I ate a lot during my training. Most mornings before practice, I ate a bar, because they were easy to eat, kept me going through practice, and were light enough that I could do the warmup run without getting cramps.

For a while I've been trying to find bars that give me energy and make me feel good. I tried a lot of different bars, from the FiberOne bars, to Clif bars to Nutrigrain. Finally I settled on Larabars. I really like that they only have a few relatively simple ingredients, they fill me up, and I can exercise right after eating them.

Wholesome, delicious ingredients.
I don't like how expensive they are, how difficult they are to find, or that I didn't make them myself! So I started to look for recipes. There were a lot of recipes for homemade Larabars, but lack of food processor basically took all of those out of the equations.

Before we left on our training trip, I tried to make a batch of energy bars. The recipe I used claimed to not taste as healthy as the input ingredients. Unfortunately, that wasn't the case--they tasted awful. I rarely throw away food, but these were that bad. Granted, I think I burned them a little bit, but there wasn't much goodness to begin with.

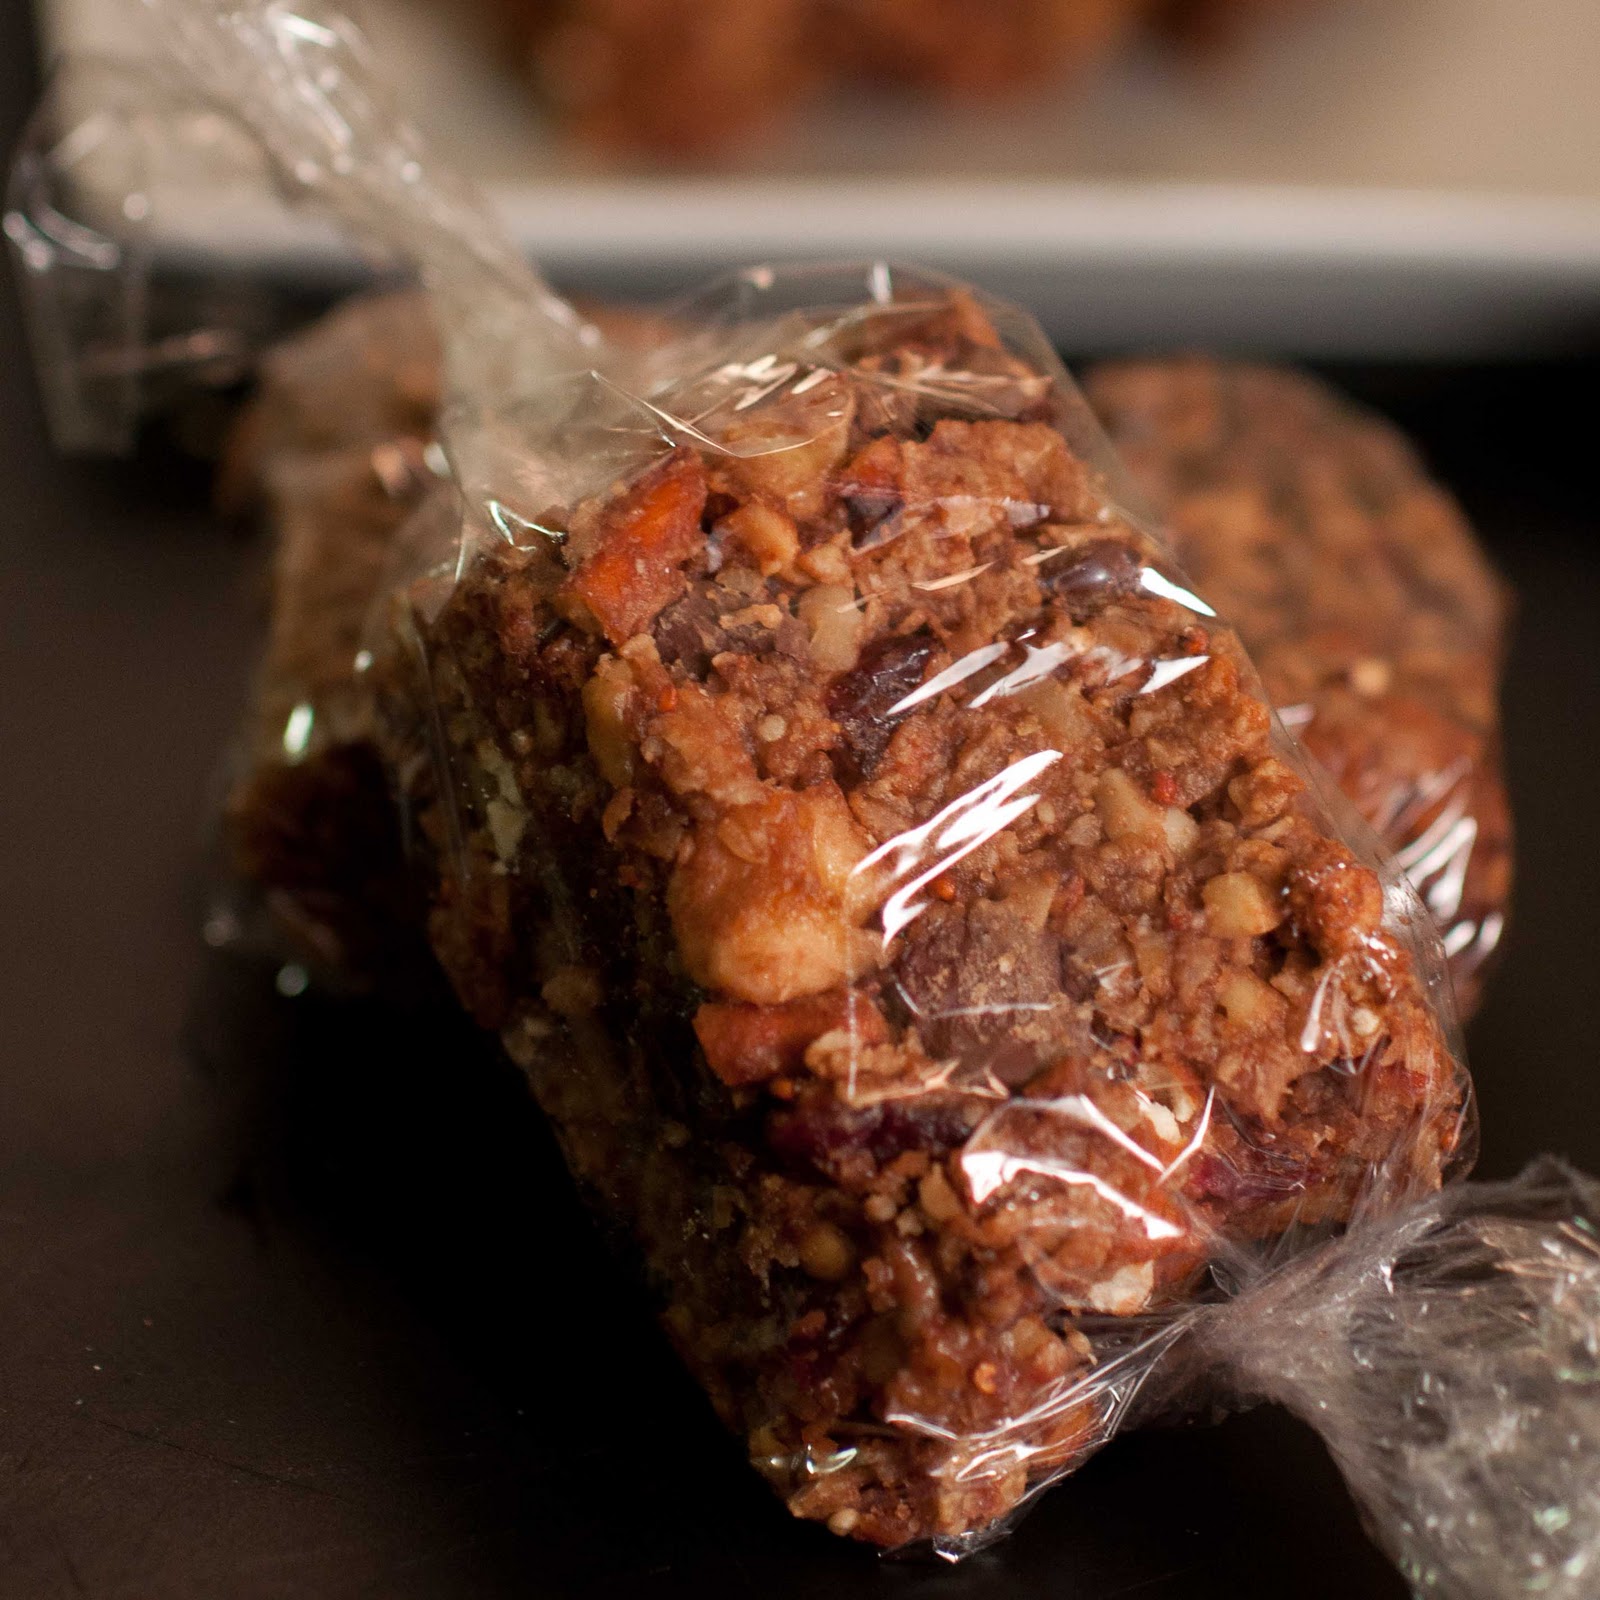
Over the course of the trip, I looked for more recipes, and found two that I liked. One of them is called "oatmeal crispies" and is basically oats, flour, butter and sugar baked into bar shape. I may try these in the future, but the other recipe sounded more like what I wanted: oats, nut butter and honey, with a whole bunch of yummy add ins.

It was really, really snowy here.
So today, D and I ventured through the snow in search of missing ingredients. We came home, mixed these up, and immediately devoured way too many of them. They're incredible!!! The rest I have wrapped up in my fridge ready to take to practice or as an afternoon snack. I'd also like to try making different versions of these.

Below, I have the general version of the recipe, which you can customize to taste however you want. I've also included our version at the very bottom (because it's that delicious) and the version I'd like to try next!

We both had these for dessert, that's how good they are.
----- ----- -----
Customizable Energy Bars
adapted from (never_home)maker
makes approximately 20 bars


Ingredients:

1.5c nut butter
1c honey (or other liquid sweetener, like sugar syrup or agave)
1t vanilla
0.75c water 

2.5c quick cooking grains
0.5c powder (e.g. protein/cocoa/milk)
1c coconut flakes (you could probably replace this with more grains)
1.5c nuts (chopped) and seeds
1.5c dried fruit, chocolate chips, etc.
2c fresh fruit, chopped into small pieces
1c crunchy, salty stuff

1.28.2011

Eating in Austin, TX

Our team is in Austin, TX for our annual training trip. Of course, that means 2 practices a day and lots of hungry bellies, so of course lots of food has been consumed. Most of it has been the mediocre hotel food, but we've managed to try a few Austin favorites:

The menu was limited to only 5 items when we (yes, all 150 of us) visited this taco truck, so we couldn't try everything. On the menu: chicken fajitas, beef fajitas, some sort of shrimp taco, the 'trailer park' and a vegetarian option with avocado.

I tried the trailer park, the beef fajita and the veggie option. The beef fajita was just ok. The sauce was delightfully refreshing and just spicy enough, but the lettuce on it was flavorless, probably free of nutrients and otherwise pretty pointless. The beef was not too far behind the lettuce. It was thoroughly overcooked and just generally not very good.

The avocado taco was good, but pretty boring. I would have appreciated a little bit more pizazz on it--maybe some tomato chunks, or a radish/cabbage slaw for some crunch? Even whole beans instead of refried would have made for a more interesting mouth feel. All the flavors worked, but the textures weren't quite there.

1.26.2011

Science and Cooking

Have an hour or two or 15 to kill? I'll be watching this:
http://www.youtube.com/harvard#p/c/0/d9av8-lhJS8

(You can fast forward through the first 15 minutes or so of the first video)

It's a class that Harvard runs, with a public lecture series alongside it; the lectures are video taped and posted on youtube. It's all about teaching science in the context of cooking. Cool!

1.22.2011

(Vegan) Chocolate Grapefruit Marzipan Cupcakes

Wow, what a mouthful.


These were pretty incredible. I put the vegan in parentheses because they don't taste at all vegan... at all. It took a while to get the frosting down, and you'll probably need to taste just to check and make sure it works with your cocoa powder and your grapefruit, but it should be very tart and chocolatey. It will be balanced by the sweetness of the cake and the richness of the marzipan.

My sister sent me pig shaped marzipan, so I thought I would mock the fact that these cupcakes are vegan by putting slices of pig on top of them.. It's a little difficult to tell what they are, but at least I was amused.

----- ----- -----
(Vegan) Chocolate Grapefruit Marzipan Cupcakes
makes 12 cupcakes


Ingredients
0.75c soy milk
0.25c fresh grapefruit juice (this is about half of a juicy grapefruit's worth; if you use the whole half and it's not enough, use equal parts soymilk and vinegar to fill out the quarter cup)
grapefruit zest from as many grapefruits as possible (I used two, three would be great, but one would also be ok)
0.75c sugar (make sure it's vegan!)
0.33c canola oil
1c all-purpose flour
0.33c cocoa powder (I used Ghiradelli--yum! make sure the only ingredient is cocoa powder!)
1t baking soda
0.25t baking powder
0.25t salt

3T cocoa powder
0.25c fresh grapefruit juice (use the other half of the juicy grapefruit!)
4T powdered sugar

12 pieces of marzipan

Directions
1. Mix all the ingredients through salt together in a mixing bowl.
2. Pour ingredients into muffin tins (they should be about 2/3rds of the way full) and bake for 20 minutes at 350°F, or until the tops spring back when pressed gently.
3. While the muffins are baking, mix the 3T of cocoa powder with the remaining grapefruit juice. It should be very runny and very tart. Add powdered sugar 1T at a time until the frosting thickens to a thin buttercream consistency and the tartness is just overcome. (This is really to taste, so taste!) If it's still thin but sweet enough, add more cocoa powder. If it's too thick but still tart, either add more grapefruit juice or add some soymilk.
4. Let the cupcakes cool completely before frosting them with the glaze/frosting. (If it's liquidy, just dip the tops into the frosting and let them dry; otherwise, spread like regular frosting.)
5. Top each cupcake with a piece of marzipan.
----- ----- -----

Baguette Pieces

I made baguettes for the first time last year, but they go stale so quickly and it's really hard to freeze them. They're good for a nice treat, or if there are a lot of people around. I've been trying to stock D up for a week home alone, so that didn't really make sense.

They look like mini loaves of bread!
Instead, I decided to make baguette pieces, like I'd had at the Cheeseboard (also known for their incredible pizza). I have no idea how they get the pseudo-square shape to their baguette pieces that's just perfect for sandwiches. Mine turned out round and very small, but they're perfect for two small sandwiches.

To make them, I just took my favorite baguette recipe and split the dough into rolls instead of loaves. The shaping method is a little tricky and took me a while to get right (I used it to make my homemade bagels, too!), but it makes really nice round rolls.

I forgot to slash these rolls as well but they seemed to turn out just fine anyways. D said some of them were a bit dense, but many of them split and developed gorgeous crusty ears all on their own. I would suggest slashing them, if you remember. Don't worry if you forget, though!

Before making these, I recommend testing the seal on your oven. You have to steam bread to get it crusty and if your oven doesn't seal well, it won't work. Do this by heating the oven up and either tossing cold water onto the oven floor or tossing it onto a preheated pan. Close the oven door immediately and wait five minutes.

If you open the door after five minutes and it feels like a summer day in New York City (aka a blast of steam hits your face) then you're good. If it's dry as an Arizona summer day, look at the notes at the bottom for alternate steaming methods.

The directions below don't require a stand mixer. If you have one, feel free to use it; you probably won't need to knead the dough for as long.

Total time:
30 minutes to make the dough
1.5-2 hour rise
15 minutes shaping
30-45 minute rise
30 minute bake
= 3.25-4 hours total time, 50 minutes active time

----- ----- -----
Baguette Pieces
makes 16 small pieces
adapted from Steamy Kitchen


Ingredients
4.5c bread flour
2t instant yeast
2t salt
1.5c warm water (approximately 110°F)

1.19.2011

thirty minute dinner and dessert


We prepped a bit beforehand because we had to travel to the kitchen with all of our stuff, but I got home from practice at 6:15 and we had dinner on the table by 6:45. Dinner was pasta with chicken and veggies plus chocolate chip cranberry nut scones for dessert. If you spend 10 minutes (or less) prepping in the morning before you head out for the day, you could have dinner + dessert ready in thirty minutes or less.


The leftover scones make great breakfast/snack the next day, too!!!

The recipe looks complicated, but it's pretty simple. Basically, mix the scone batter while you're waiting for the water to boil, and bake them while the pasta is cooking. (You can also bake them while you're eating, if it's too hectic to try to bake them while cooking.) Then once the pasta is in the water, cook green beans, and heat pre-cooked chicken, canned corn and tomato sauce; combine with pasta and you have dinner. Yum!

----- ----- -----
Thirty Minute Meal
serves four

1.15.2011

A Mission for Recipes

Although I told myself I could only bake twice until finals were over (2.5 more days!!), I fully intend to bake practically continuously between Tuesday afternoon and Saturday morning, when we leave for our training trip in Texas.

In preparation, I'm collecting recipes. I'm working on expanding my repertoire. I'm excellent at muffin and cooking baking and decent with cakes, but generally not particularly adventurous.

In one of the booking I read (Cooking for Geeks, I think), they said there were 5 types of chef. I don't remember all of them, but I do remember what I am and what I would like to be. I'm definitely the 'healthy chef', the one who tries to make healthier substitutions for things. (I do this all the time!! Whole wheat flour, decreasing the butter, adding fruit or nuts...)

I'd really like to be the 'adventurous chef', the one who uses interesting ingredients and bold flavor combinations. I'm definitely limited by access to ingredients and my cooking equipment, but I want to push myself to try new things.

On my list for the coming week:
- scones (I've never made them before!)
- brownies (I think I'll use this recipe)
- milk tea cupcakes (I'd like to use peppermint tea, or maybe Sleepytime? Chai tea would probably also be really yummy!)
- homemade energy/granola bars (still looking for an easy recipe without a million ingredients)

This list will probably expand, but let's just say I'm excited for Tuesday evening!

1.12.2011

How to Use a Rowing Machine

Okok, I know this is a food blog, but how can you eat as much as you want without exercising?! I'm a varsity athlete here, and I definitely enjoy both working out and eating.

I don't enjoy watching people come close to injuring themselves when they try to use one of these:
A rowing machine, aka an 'erg'
I can hardly teach you the technique without a video, which I don't have the capability to take at the moment. However, I can give you a few pointers to teach you how to use one better!

These things give you a great workout. Unlike most cardio machines, you use your upper and lower body at the same time. You also build a lot more muscle than you would running, which means you keep burning calories for longer after your workout.

Because you use your back muscles, you get a really strong back (which is otherwise pretty hard to train) and a great core. It probably won't give you great calves, but the arms, shoulder, butt and thighs are all in for quite a workout.

For the basics on how to use an erg, either look at the pictures on the actual machine, or check out the manufacturer's website. It's got a lot of information on how to get started. Here I'll give you the inside information from somebody who has spent a lot of hours with her butt on one of these machines.

----- ----- -----
1. Use the drag setting to your advantage.
Like most machines, ergs are adjustable. In the picture above, the big round fan section has a dark blue dial on it that allows you to adjust the resistance. The higher the dial, the harder it is to pull the handle. Since rowing uses your back, and backs are not fun to injure, START AT A LOW RESISTANCE!!! Even the U.S. national team sets the damper lower than most recreational users who don't know any better. Generally between a 2 and a 4 is a good place to start.

1.08.2011

In a pinch...

... you can use ground up popcorn instead of coarse cornmeal.

Over the holidays I made some baguettes, but unfortunately forgot to pick up polenta (i.e. coarse cornmeal) from the store while I bought ingredients. The polenta keeps the dough from sticking to the pizza peel (or back of baking tray) while it rises. It makes it a lot easier to slide into a hot oven!!!

I also think polenta gives the bread really great flavor. It's even better with pizza crusts. Try it next time you make a crusty loaf of bread! (I'll post a recipe at some point.)

We scrounged through the pantry to find suitable replacements, and after trying to quickly make bread crumbs, considering oatmeal, and even looking at some Malt-o-Meal (before realizing it was brown sugar flavored), I realized that popcorn might work.

We used D's dad's coffee grinder to grind up some kernels (I wouldn't do this on a regular basis--it kind of wears on the grinder), and voila--coarse cornmeal.

What are some of your substitution tricks?

Pumpkin Pecan Pie: Further from Tradition

OK, so the pumpkin pie + graham cracker crust was definitely a step up from standard pie crust... but we've made it even better! The biggest complaint from the peanut gallery was a lack of crust crispness on day two. Of course, I knew this meant we needed something that wouldn't absorb any of the liquid from the pie.


Nuts were the perfect solution. The update is just to the crust, but I've included the filling recipe again. You're welcome to use your own pumpkin pie filling, but this one is pretty spectacular! It's got a lot less liquid than most pie recipes, so the spices stay well incorporated and the pumpkin flavor shines.

-----
Graham Cracker Pecan Crusted Pumpkin Pie
makes 1 9-inch pie crust


1.06.2011

Dinner in the Microwave: part 2

It's finals week(s) so time is stretched pretty thin right now. Of course, the solution is not to take a blogging break, but to make dinner in the microwave instead!

This is a delicious, protein-packed meal, perfect for two. To make it vegetarian, leave out the chicken, and grate 1-2oz. of cheddar, mozzarella or jack cheese on top of each serving.

-----
Protein-Packed Microwave Dinner
serves 2


Ingredients:
1c quinoa
2c water
1 15-oz can beans (I used black beans)
6oz. leftover chicken (preferably still cold from the fridge)

Directions:
1. Microwave the quinoa and water in a large, microwave safe container with a loose-fitting lid or plastic wrap for 5 minutes.
2. Meanwhile, cut the chicken into small pieces. Rinse and drain the beans. Mix together in a microwave safe container.
3. When the quinoa has finished, take it out of the microwave and put the chicken and beans in for 2.5 minutes.
4. When the chicken/beans are done, put the quinoa back into the microwave for an additional 5 minutes. Set the table while you're waiting.
5. When the quinoa is done, let it sit for 2 more minutes; if your chicken/beans aren't hot enough, put them back in the microwave during this time.
6. Serve with some freshly grated cheese and some sort of spice. (I used Italian seasoning and romano cheese... yum!)
-----

It turns out, quinoa is much easier (and faster) to make in the microwave than rice.

1.02.2011

Bridge Creek Heavenly Hots

When I was a kid, my dad made these for us on the rare Saturday morning. Other pancakes have never lived up to these wonderfully light silver dollar pancakes. I made these for D and his parents this morning. They were a huge hit.

These little pancakes are light, fluffy and delicious.
The banana slice gives you an idea of just how small these pancakes are.
This slice is from the very end of the banana, so it's a small slice.
Of course, my dad has made a few updates to the original recipe. It makes them a little bit easier to work with. Even so, they're pretty easy to mess up.. my first attempt was fairly unsuccessful. I've tried to add as many tips as possible, so read the recipe all the way through twice before you make them.

Also, before I share this recipe, you have to promise me that you'll try them plain before you put anything on them. We used to eat them with my mom's homemade jam. Whatever you do, don't ruin them with that fake pancake syrup made of high fructose corn syrup and caramel color.

Hasselback Sweet Potatoes

We made this for dinner last night. They took a bit of time to prep, but once they went into the oven they were super easy. They're also really pretty and delicious. The sweet potato goes really well with the garlic, since the roasted garlic is a little bit sweeter than raw garlic.

Unfortunately, once again, there was no time to get pictures before they disappeared into our hungry bellies. If you've never heard of hasselback potatoes before, I suggest looking at a recipe like this one, with pictures, so it makes more sense.

-----
Hasselback Sweet Potatoes

Ingredients
sweet potatoes or yams (I used garnet yams)
garlic, thinly sliced (you'll need about one cloves for every potato)
olive oil (you'll need about a tablespoon per potato)
salt
pepper

Directions
1. Preheat the oven to 400°F.
2. Wash the potatoes and cut off the ends. Slice the potatoes almost all the way through every quarter inch.
3. Place a slice of garlic in each slit of the potato. (These should help hold the potato slices apart.) This is easiest to do if you hold the potato up off the cutting board--the potato opens up like a fan.
4. Rub each potato with olive oil and sprinkle generously with salt. Grind a some fresh pepper on top.
5. Bake for 40-60 minutes, until a knife slides through the potato easily. These are really good when they get really soft.
6. Eat fresh or as leftovers. Yum!!!
-----

1.01.2011

Dill Rolls

These rolls were very popular with D's parents
D's grandma, Kate, makes famous dill rolls. I've never tried them, but at least three months in advance of Christmas, D was already excited about having them for Christmas dinner. Unfortunately, Grandma Kate didn't make dill rolls this year, and much of the family was left sorely disappointed.


When we got back to D's house from Christmas dinner, I made a version of dill rolls. We called G. Kate, and she didn't have the exact recipe, but we got enough to make a good first attempt.

My baking pans weren't quite big enough—the rolls merged!
-----
Imitation G. Kate Dill Rolls
makes 24 rolls

Pumpkin Pie: a Break from Tradition

As shocking as this may be, I didn't have more than a taste of pumpkin pie until last year, and the few times I tried it, I didn't like it. Then last year, one of my hallmates requested that I baked some pie, so I decided to try my hand at apple pie and pumpkin pie.

Not knowing any better, and wanting to minimize the chance of disaster, I bought crusts. Little did I know, this was my greatest stroke of genius. While I bought a standard pie crust for the apple pie, I decided to buy a graham cracker crust for the pumpkin pie. Delicious!!! I know it's a break from tradition, but if you've ever been even slightly dissatisfied with the crust of a pumpkin pie you should try it.

Included below is the recipe for the crust and filling. Of course, you could buy the crust, but why would you when it's so easy to make???

I would love to have more pictures, but half of the pie disappeared before we could take any pictures... and the rest disappeared within 24 hours of its emergence from the oven.


Delicious pumpkin pie!

Related Posts Plugin for WordPress, Blogger...